Sunday, April 7, 2013

Taking Portraits : For Beginners

Here are some tips on portraits photography for beginners when using Auto or P mode.

Tip 1

Enable Face detection. It might be enabled by default. Just verify it.

Tip 2

Ask the person to wear dark cloths especially if he/she is dark.
When a dark person wear bright cloth and face the camera the camera adjusts the brightness based on the brightness of the dress and the person would look darker.

Tip 3

Choose dark backgrounds. Same theory.

Tip 4


Fade the back ground.
You may do it by changing aperture. If you don't know what is aperture don't worry. Just take a few steps back and zoom your camera. It focuses on the person and the back ground gets blurred. If background is still not enough blurred go back further.

Tip 5

Keep the person on a side of the frame instead of centre.
It is better explained in the section Composition. Click here to Check it out
You might face a small problem here, the camera may focus on the background instead of the person. You can figure it out by when the green frame appears(in Canon Cameras) when you half press the button.
Handling this is easy. Place person in the middle of the frame half press the button and the green rectangle appears on he person(i.e.the person is in focus). Keep the button half pressed and move the camera so the person is in the side of the frame. Press the button completely.
 
For More

General

Tips for Beginners

Lessons for Beginners

Cameras

Friday, April 5, 2013

Shutter Speed Selection Based on Scenario

Here are some basic scenarios and typical shutter speeds which you can use

Shutter speed  in Seconds           Scenario

1/4000 Freezing Extremely Fast movement
1/2000 Freezing birds in flight
1/1000 Freezing fast cars,bikes,etc
1/500 freezing sports players or slow verhicles
1/250 Freezing walking people or animals
1/125 Panning cars or bikes
1/60 Portraits
1/30 Panning vehicle with shadow effect
1/15 Panning children or adults
1/8 Blurring water falls
1/4 Blurring people
1/2 Blurring slow moving water
1 sec or slower Milky Water Effect


How to compare actual quality of cameras?


This is a question asked by one of my friends, Mustafa Niyas: 

How to compare actual quality of cameras?
MP is not sufficient. I bought Nikon L20 2 years before -10MP. But its quality is very poor compare to canon basic models for indoor.

Answer

To decide which gives better quality there are two sets of parameters. One set you  can find in specification and the other set you don't. That you need to find out by actually taking photographs with each of them.


First Set
  • Mega Pixel - The more the better
  • Image Stabilization Feature - May not be present in basic cameras
  • File Format - RAW is better than JPEG
  • Size of Sensor - The bigger the better
Second Set
  • The sensitivity of sensor or the quality of it, which you can not find out by seeing spec.
  • Quality Image stabilization.
  • JPEG compression algorithm and compression factor.
  • Auto Focusing algorithms

So, if you want to do actual comparison try to borrow both model from friends and test it by taking photos with both.
While testing indoor photos you may use the techniques I explained in this post: Using Digital Cameras in Low Light.
Or setting everything(aperture,shutter speed) in manual will be better option.

Tip: For indoor photos with low light keep your camera in a tripod or something with image stabilization disabled to get better pictures.


For Beginners: Make Your Scenery Shots Colorful

Applicable: Digital Cameras

Most of the people like taking photos of landscapes with rich colors.
But if we use our 'favorite' auto mode we might end up with photos which are not having enough contrast which we saw with out naked eye.

This is an easy and effective solution for you.

If your camera have a scene selection mode, go to that mode and choose 'Landscape' mode or 'Foliage' mode.

If you don't have that mode or you want more flexibility, put your camera in to P mode.
Turn off your flash.(Flash compulsory off mode).
Go to My Colors in the menu(You will get it by pressing function button in Canon).
By default it will be 'Off', select 'Vivid' and it will make your shot more colorful and contrast.


Canon Camera Shooting Modes


These are the modes available in a typical Canon DSLR. Based on the model some modes will not be available
The shooting modes are located on the mode dial, which is the large dial located on the top left of the camera.canonmodedial 300x287 What are these shooting modes on my Canon Camera?

Canon SLR Shooting Modes

Not all cameras have the same shooting modes; these are the basics mode settings on a Canon 40D. These modes are very similar to some shooting modes on Canon digital point-and-shoot cameras.

fullauto What are these shooting modes on my Canon Camera?Full Automatic Mode

The full automatic mode on almost all digital SLR cameras is the mode where the camera chooses all of the settings: focus, aperture, shutter speed, ISO, among many others. This mode is for every level of photographers, if you are just starting out and learning about your camera and looking through the lens, or if you are a professional and you need to take a quick picture without having the time to play with any of the other modes. The automatic mode will choose the settings for you based on the scene that is being photographed, if there is low light, it will choose to open the aperture and slow down the shutter speed, if it is bright outside it will close the aperture and speed up the shutter. The automatic setting also requires you to use automatic focus, so the camera will pick the focus and depth of field to be used. The automatic mode will also use the on-camera flash when more light is needed.
Quick Tip: When you are trying to focus on a subject and auto focus is not picking what you want to focus on, move your camera to center on your desired focal point, click half way down on the shutter to focus, do not release, and then move back to your original frame to complete your shot.

portrait What are these shooting modes on my Canon Camera?Portrait Mode

This automatic portrait mode setting is for when you want to take portraits or group shots. Along with softening skin tones, this mode will blur background tones. The blurring of the background details will allow your subject to pull away from the background more. Great for when taking portraits in front of any scenery or landscapes.

landscape What are these shooting modes on my Canon Camera?Landscape Mode

This automatic landscape mode setting is for landscapes and scenery images. This setting is perfect for when you want to take a picture of something farther away to get “the big picture,” even if it is not just a landscape, as well as for wide shots, to have everything from near to far in focus. This mode will also increase the blues and greens in your scene to make your image more vivid. The on-camera flash will not be used in this mode so that you will not accidentally illuminate your foreground. Since the flash will not automatically go, this is a good scene for night landscapes as well. If you are not able to get close enough to the scene that you would like to get a photograph of, use a telephoto lens, like the CanonEF 70-300mm f/4.5-5.6 DO IS USM, or if you would prefer one with a lower f-stop capability good for sports and action shots, then the Canon EF 70-200mm f/2.8L IS USM would be good for you.

closeup What are these shooting modes on my Canon Camera?Close Up Mode

This automatic close up mode is for anything that you want to get close to, such as flowers, bugs or butterflies, and any other miscellaneous small objects. It is highly recommended to use a tripod while using this mode since it is possible that any hand movement may blur the image. If you do not have a tripod, try to rest your camera on a flat surface during the shot. If your image is still coming out not in focus, try taking the image a little further away; the standard lenses are only able to get so close. If you would like to take pictures even closer, look into getting a macro lens, like the Canon EF 50mm f/2.5 Compact Macro. The flash will go off if you are in a low light setting with this mode, sometimes this will throw off the balance, so try to make sure to move yourself out of any shadows and use as much light as possible.

sports What are these shooting modes on my Canon Camera?Sports Mode

The automatic sport mode setting will help you to take stop-action photographs of sports, running children, or other fast speed objects. Sports mode makes your shutter speed very fast allowing for items in the scene to be frozen. This is great if you are wanting to get stop-action photographs of any sports game, or to even try out during a firework or water-work show to freeze the water and light flares in motion. The on-camera flash does not automatically get used in this mode. To get closer to the field or to the show, use a telephoto lens, like the Canon EF 70-200mm f/2.8L IS USM. If your camera has the ability to do continuous shooting, hold down your shutter button continuously to take multiple photos.

nightportrait What are these shooting modes on my Canon Camera?Night Portrait Mode

The automatic night portrait mode will help you take a better portrait in low light or at night. This mode will help to make your background more natural looking. If you are able to use a tripod or flat surface with this mode it will help, though it is not required. Since the on-camera flash is used in this mode, your subject will be frozen, but hand movement may blur the background if it can not be reached by the flash.

flashoff What are these shooting modes on my Canon Camera?No Flash

The no flash mode is perfect for those locations that flash photography is prohibited, like museums and plays. If the scene is low light, but flash is prohibited, trying using a tripod or a flat surface to prevent blurring. This mode is also good for taking automatic pictures of other scenes that do not require flash, or when you know you do not want to use the flash. I prefer to not use the flash if it is not necessary, so I recommend this mode over full automatic so that you still get the camera choosing your settings, but you get to use the natural light.

manual What are these shooting modes on my Canon Camera?(M) Manual Exposure Mode

The manual setting is one of the ‘creative mode’ settings on a canon, where you can choose your shutter speed and your aperture to create any match of the two that you desire. You will be able to choose if you want the image to be a little darker, a little lighter, or even a slower shutter speed, and you can interchange the two as needed. In this mode you will see the aperture and shutter speed numbers through the viewfinder called the exposure level indicator. You can use dials on your digital SLR to change these settings. In this mode you can have auto focus turned on or off, and you can choose which selectors to use for your focus if automatic focus is turned on. This setting is recommended for more experienced photographers. If you are just getting started with your camera, and you want to use this mode, start off experimenting with the settings and seeing what works, your goal is the get the smaller bars on the indicator as close to zero as your are able to, as zero is the “correct” exposure. Use of this mode may require a tripod and flash.

aperturepriority What are these shooting modes on my Canon Camera?(A) Aperture Priority Mode

If you would like to choose your aperture, allowing you to choose your depth of field, aperture priority is a good choice. Aperture priority will allow you to set the aperture, again with your dials, and will choose the best matching shutter speed for you. This will allow you to change your depth of field manually, so you can increase or decrease the focus on your background details, as well as let you bring both into focus if you would like. To increase your depth of field and allow more things to be in focus, make sure you change your aperture to a larger number, this creates a smaller aperture hole. To decrease your depth of field, and cause some objects to be out of focus, make sure to set your aperture to a smaller number, this creates a larger aperture hole.

shutterpriority What are these shooting modes on my Canon Camera?(S) Shutter Priority Mode

Shutter priority is the exact opposite of aperture priority, it allows you to select if you want a fast or slow shutter speed while the camera chooses the best aperture for the shot. You are able to use this for stop-action shots as well as blur motion images. If you slow down the shutter speed on a moving subject you can blur the action, illustrating the motion in the photograph. Both the aperture and shutter priority modes allow you to get out of the box with your images and experiment with what you can do with your camera.

programae What are these shooting modes on my Canon Camera?(P) Program Mode

If you would like to choose some of the settings, but not all of them, use the Program Mode. While on the P mode the camera chooses the correct shutter speed and aperture for your chosen frame. This mode is good for when you want to do something creative with your images and get different variations of light and depth of field, but still want the camera to help you with the settings. You still have control of the flash and focus in this mode. You can keep the correct exposure and set a lower aperture or shutter speed by toggling the aperture or shutter speed dials while keeping the shutter button half clicked. Make sure that if your shutter speed gets below 1/250, displayed as 250, to use a tripod (personal opinion, some people may want to use a tripod at higher higher speeds as well).

custom1 What are these shooting modes on my Canon Camera?C1, C2, C1 Modes

The C series modes are Custom User modes. You can set your favorite camera settings to these modes. You can register these settings by configuring all of your settings, including what mode you are in, your menu settings and any custom function settings, and registering the mode by following your cameras instruction manual. These are for those settings that you change a lot of configurations for, and you wish you could save them so you didn’t have to enter them in manually every time.

autodepthoffield What are these shooting modes on my Canon Camera?(A-DEP) Automatic Depth of Field Mode

The automatic depth of field mode will set the aperture for you. It will choose a higher aperture number, which is a smaller aperture hole, to allow the foreground and background to be in an acceptable focus.
Details and images are from the Canon 40D instructional manual. Please reference this for more details if desired.
If you have a specific question on your camera, leave a comment below for us and we will help you learn more.

For Beginners: Using Digital Camera in Low Lights

Initially many of us get biased to Auto mode in digital cameras.
Then would face a situation where the light is low and our auto mode is not intelligent to provide enough light for the picture.

So, let's see what we can do
OK, first step is to come out of auto mode and move the dial to P mode.
Don't worry, with the default settings this is just like your auto mode and at the same time it gives a space to apply your taste and intelligence.

(It is called P mode in Canon and Nikon, I don't know about other cameras. But you will find a similar mode, which will be usually next to auto mode)


In this mode, for our scenario(low light) you will get three things to play around.
1. Exposure
2. Flash Power
3. ISO.

Just make sure white balance = AWB &  My Colors = Off/Natural, you can change these later.

First choose the flash mode to 'always fire' out of the 3-4 options(Auto, always fire, no flash, etc).
Next adjust the following settings. Experiment one by one and later use combinations.

Exposure: It basically controls the amount of light entering camera sensor. Increase it to give your picture brighter. Increase it by steps and take photos for each steps and see the difference.

Flash Power: As the name says it controls power of flash light. You can increase the power based on your brightness requirement.

ISO: This is the sensitivity value of sensor. It usually varies from 80-1600.
For lower light you will need higher ISOs. But I do not recommend ISO more than 400 because as it increases the sharpness of picture reduces.

So, keep ISO in 200 and try to manage with the first two options(Exposure and Flash).
If it doesn't work, increase ISO.

Wish this help you...

If you have any doubts,feed backs or any points to add please write in comment section.

For More

General

Tips for Beginners

Lessons for Beginners

Cameras

Photography Basics: Composition

Composition is the placement or arrangement of visual elements or ingredients in the frame.
For example, if you want to take photo of a person, you can keep him/her in the middle, left, or right part of the frame. As the number of objects you want to cover your number of options to arrange them in the frame increases. 
This arrangement can give dramatic effect in your photographs. You would have already experienced it.

There are few tips & tricks in this which you can learn very easily and practice.
I am covering some of those. Just read and apply one or two and you will definitely come back and learn the rest of those :)


Rule of Thirds


Very simple and Very Effective 


Imagine that your image is divided into nine equal segments by two vertical and two horizontal lines. Try to position the most important elements in your scene along these lines, or at the points where they intersect. Doing so will add balance and interest to your photo.


Most of the digital cameras even offer an option to superimpose a rule of thirds grid over the LCD screen, making it even easier to use.


The most important elements (the horizon and the haystack) are placed on or around the lines and points of intersection in this example.
More Examples


So next time when you take photo of your friend keep them on any of the two vertical lines instead of middle and see the difference 

Balancing Elements


Placing your main subject off-centre, as with the rule of thirds, Creates a more interesting photo, but it can leave a void in the scene which can make it feel empty. You should balance the 'weight' of your subject by including another object of lesser importance to fill the space.


The figure in this scene is balanced by the rocks in the foreground.


More examples


Compositional Element

To attract and hold attention of the eye, a composition should have:

·        an entry point
·        an exit point
·        elements that attract the eye
·        balance between the elements.

The eye needs a place to enter a photograph that doesn't stop it cold. Sometimes it's the primary subject; sometimes it's something that leads the eye to the primary subject. Painters add other elements besides the primary subject to attract the eye further into a picture. Artistically inclined photographers do too by selecting to include them, as they frame a photograph.


In this picture entry point is the face of the deer and exit is through the horns. Remaining points you can make out.
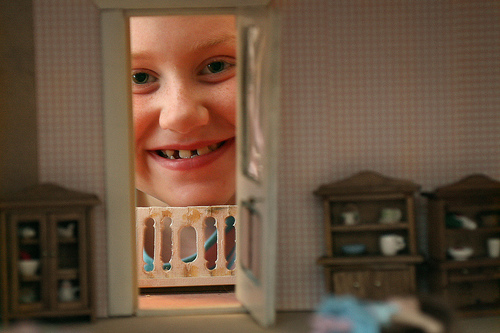


Framing

The world is full of objects which make perfect natural frames, such as trees, archways and holes. By placing these around the edge of the composition you help to isolate the main subject from the outside world. The result is a more focused image which draws your eye naturally to the main point of interest.


The archway in this scene provides a natural frame for the ruin in the background.
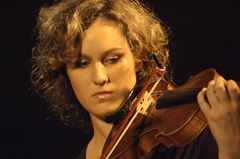


Background


How many times have you taken what you thought would be a great shot, only to find that the final image lacks impact because the subject blends into a busy background?

The human eye is excellent at distinguishing between different elements in a scene, whereas a camera has a tendency to flatten the foreground and background, and this can often ruin an otherwise great photo.

Thankfully this problem is usually easy to overcome at the time of shooting - look around for a plain and unobtrusive background and compose your shot so that it doesn't distract or detract from the subject.


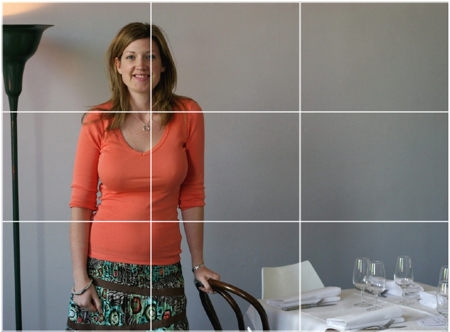
The plain background in this composition ensures nothing distracts from the woman's face.

Viewpoint

The unusual viewpoint of this photo makes for an interesting composition. Before photographing your subject, take time to think about where you will shoot it from. Our viewpoint has a massive impact on the composition of our photo, and as a result it can greatly affect the message that the shot conveys.

Rather than just shooting from eye level, consider photographing from high above, down at ground level, from the side, from the back, from a long way away, from very close up, and so on.
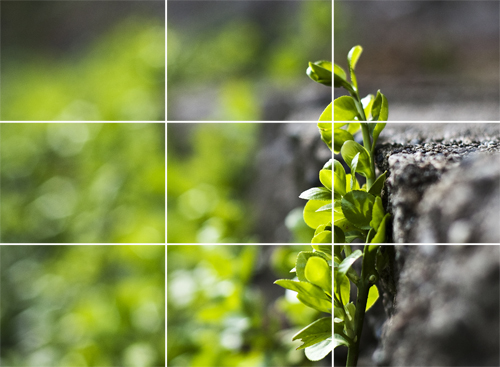


Create Depth

 You can create depth in a photo by including objects in the foreground, middle ground and background. Another useful composition technique is overlapping, where you deliberately partially obscure one object with another. The human eye naturally recognizes these layers and mentally separates them out, creating an image with more depth.


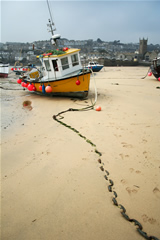
The tree stump in the foreground adds depth to what might otherwise be a flat scene. Because photography is a two-dimensional medium, we have to choose our composition carefully to conveys the sense of depth that was present in the actual scene. 


Filling the Frame


Make sure that you don't have acres of space full of nothing interesting and check for 'stuff' intruding into your masterpiece.
Sometimes your mind tends to exaggerate what you see through the viewfinder of your camera. You often perceive things a bit bigger than they actually are and you also tend not to notice 'slight' distractions. What you end up with is photographs with huge areas of wasted space around the edge and people with things growing out of their heads. Make sure your subject fills the frame.  


But don’t worry much about it you can crop the image in the software later

Space 

There can be a fine line between filling your frame with your subject (and creating a nice sense of intimacy and connection) and also giving your subject space to breath.
Either technique can be effective – so experiment with moving in close and personal and moving out to capture a subject in its context.


Symmetry and Patterns


We are surrounded by symmetry and patterns, both natural and man-made, and they can make for very eye-catching compositions, particularly in situations where they are not expected. 


Another great way to use them is to break the symmetry or pattern in some way, introducing tension and a focal point to the scene.


The symmetry of this scene is broken by the uneven staircase and the closed curtain.


Placing the Horizon Line

In outdoor photography, where you place the horizon line in your frame has a powerful effect on how your compositions are interpreted. Shifting horizon placement by tilting the camera up or down can alter the entire balance of a scene.
Placing the horizon high in the frame, for example, an accent foreground details and enhances the sense of distance. Take care when using expansive foregrounds to get as much depth of field as possible. If your camera has an aperture-priority or landscape mode, use it to set a small aperture (f/11 or smaller) to ensure maximum near-to-far sharpness. Shooting from a high vantage point and tilting the camera down so it is more parallel to the plane of the foreground also helps extend the range of sharp focus.


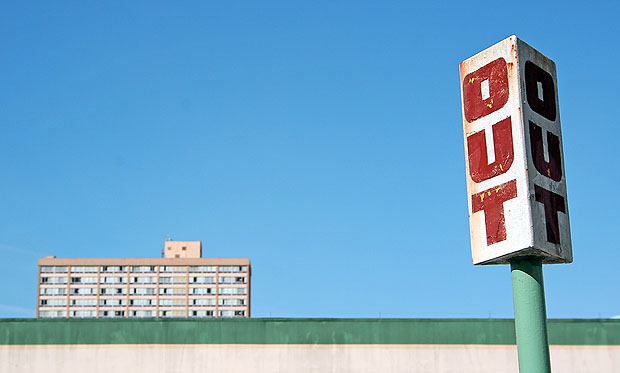
Horizons placed very low in the frame heighten the isolation of subjects at the horizon. In isolating a lone person at the bottom edge of the frame at right, the photographer has created an atmosphere of emptiness by contrasting it with the vastness of the sky. Low horizons are effective, too, for capturing dramatic skies: colorful sunset-illuminated clouds, for instance.

Dividing a composition in half by placing the horizon across the middle of the frame is often considered breaking a sacrosanct design rule, but it isn't quite as serious as cheating on your income taxes. Try it. If it works—as it sometimes does in catching mirror reflections in pond or lake scenes—use it without shame.
Often not including a horizon at all is what works best. Instead of struggling to find the best placement, zoom in on a main subject and eliminate the horizon. Finally, no matter where you place the horizon, keep it level unless you're intentionally trying to rock your viewers' visual boats.

Lines

You may not think of lines as being as exciting a travel subject as, say, a jungle snake slithering through the grass. But photograph that snake and you will surely have captured a distinctive—and emotionally charged—line. Nor would the idea of photographing a line in the sand seem irresistibly intriguing, unless it was the sinuous line of a sand dune shifting in a desert wind.


Lines have many uses in a photograph. They can divide, unify, or accent certain parts of a composition. If they are interesting enough, they can become a visual topic in themselves: Who could resist the lines of a spider's web glistening with dew? Stay alert to catch transient lines, like shadows or shafts of light, before they disappear.

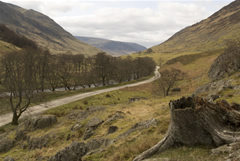
Lines lead the eye into a scene. Stand on a train platform and you'll see it's all but impossible to keep your eye from following the line of the tracks to the horizon. Parallel lines that appear to converge this way create what's known as one-point or linear perspective, potent for showing distance and depth in a photograph. Curved lines can lead equally well: The undulating lines of the country road draw the eye into the frame.


Leading lines are most effective when there is some relation between line and subject, such as winding stone steps leading to a castle door. You can exaggerate their impact further by using a wide-angle lens and finding a vantage point close to the beginning of the lines—kneeling to get close to train tracks, for example.


The shape and the direction of lines in a photograph are also forceful setters of mood. Straight lines, whether vertical or horizontal, seem stable and formal. The sharp lines of a picket fence have little sensuousness, but consider the alluring slopes of rolling hills or a tanned body lying on the beach.

Colors

The colors in an image and how they are arranged can make or break a shot.
Bright colors can add vibrancy, energy and interest – however in the wrong position they can also distract viewers of an image away from focal points.
Colors also greatly impact ‘mood’. Blues and Greens can have a calming soothing impact, Reds and Yellows can convey vibrancy ad energy etc.


Start trying these and wish you take wonderful photos :)

Tip : All the above rules are made to break too. Break it whenever you feel that would be better